You press print and happily collect your document. But have you ever stopped to think what’s going on inside your printer?
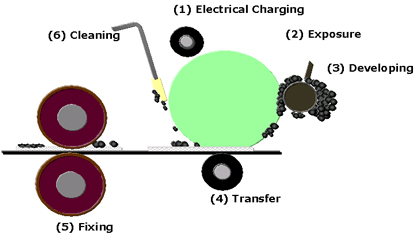
Take a look at this step by step guide explaining the six stages of the Canon printing process.
1. Electrical Charging: When the user presses the print button the photosensitive drum prepares itself by producing static electricity.
2. Exposure: Now that the drum is fully charged with static electricity, laser beams are able to scan the surface of the drum. The laser beams engrave the image or text that you have sent to print on the surface of the drum.
When using a copier this process is done using light, the light scans the page required for printing and converts it into an image.
However, when printing from your PC, the PC itself converts the digital file into image data, which then continues to stage 3.
3. Developing: The toner now attaches itself to the drum. The drum rotates allowing the toner to drip droplets of ink into the engraved areas of the drum surface. The image that was engraved on the drum surface has now been filled with ink.
4. Transfer: Static electricity picks up the paper from the paper feeder and affixes it to the drum. The ink is then transferred from the drum onto the paper.
5. Fixing: Heat and pressure rollers are applied to firmly attach the ink to the paper. Your document is now complete and will be released onto the paper tray.
6. Cleaning: Now all that is left is to remove any remaining ink residue from the drum. The drum continues rotating as a blade passes over it to remove any ink residue. The drum is now clean and ready to be used again.
With all these steps involved, looking after your printer is of paramount importance. So make sure to take a look at our Easy Peasy Maintenance Tips.
(Source: Canon.co.uk)

